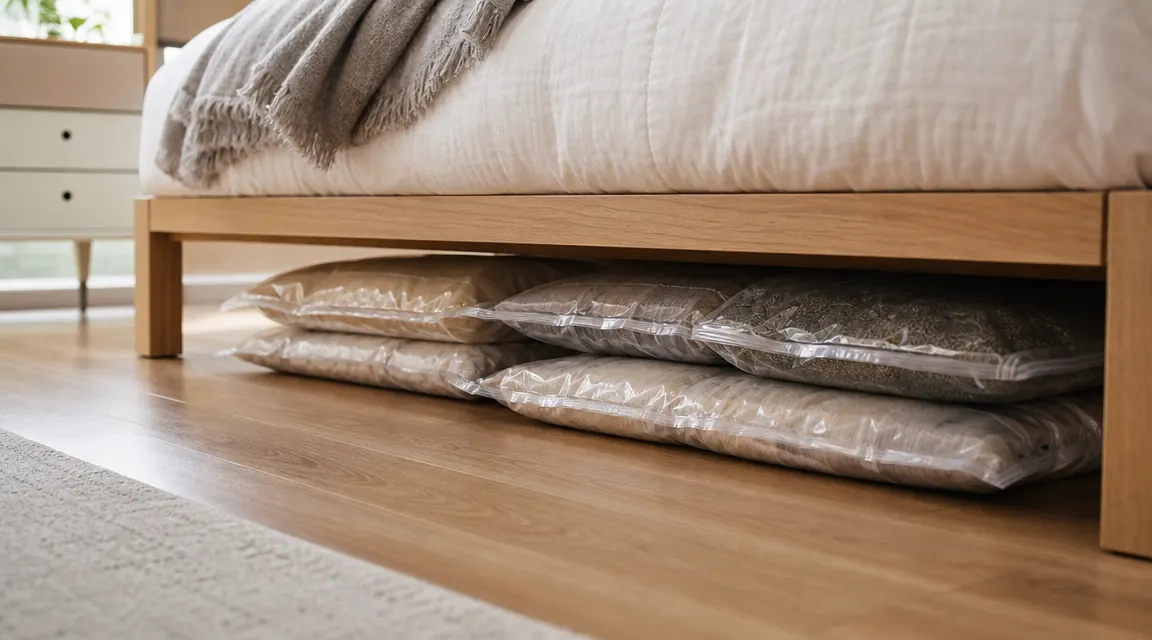
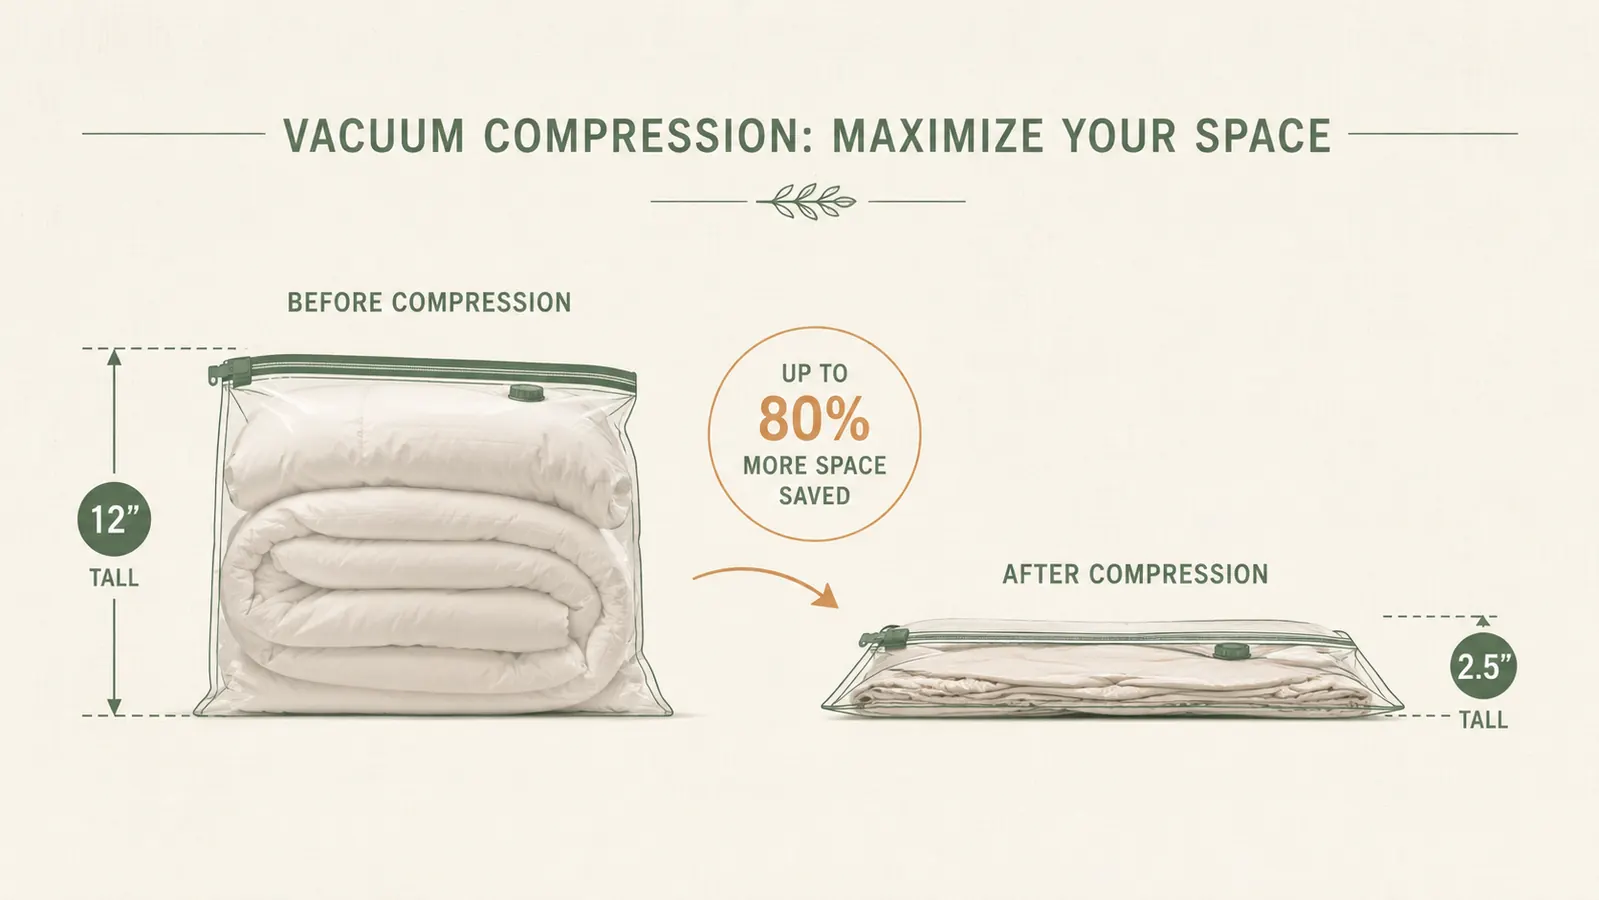
Under-bed storage is the most underused square footage in any bedroom. In a 700-square-foot apartment, a queen bed frame sits over roughly 28 cubic feet of dead space. In five rentals, I wasted most of it on flat storage bins that collected dust and rolled out of reach, or I stuffed bags in there with no system and forgot what I owned. The real problem is not space. It is thickness. A winter comforter that takes up half a closet rod is still eight inches tall when folded. Slide that under a bed with 9 inches of clearance and it barely fits. Vacuum down to 2.5 inches and suddenly you have three comforters under there with room left over.
I have been using the Amazon Basics Vacuum Storage Bags for three seasons across two apartments and the house I finally own. They have 90,964 reviews and a 4.4-star rating for a reason: the basic concept works, the bags hold their seal through a full season, and they cost less than a dinner out. But a lot of people buy them, shove them under the bed half-packed, and wonder why it feels chaotic three months later. This guide covers every step that matters, so you do not end up in that position.
The bag that compresses a comforter down to 2.5 inches
Amazon Basics Vacuum Storage Bags have 90,964 reviews and hold their seal through a full storage season. Available in multi-size packs so you can match the right bag to each item.
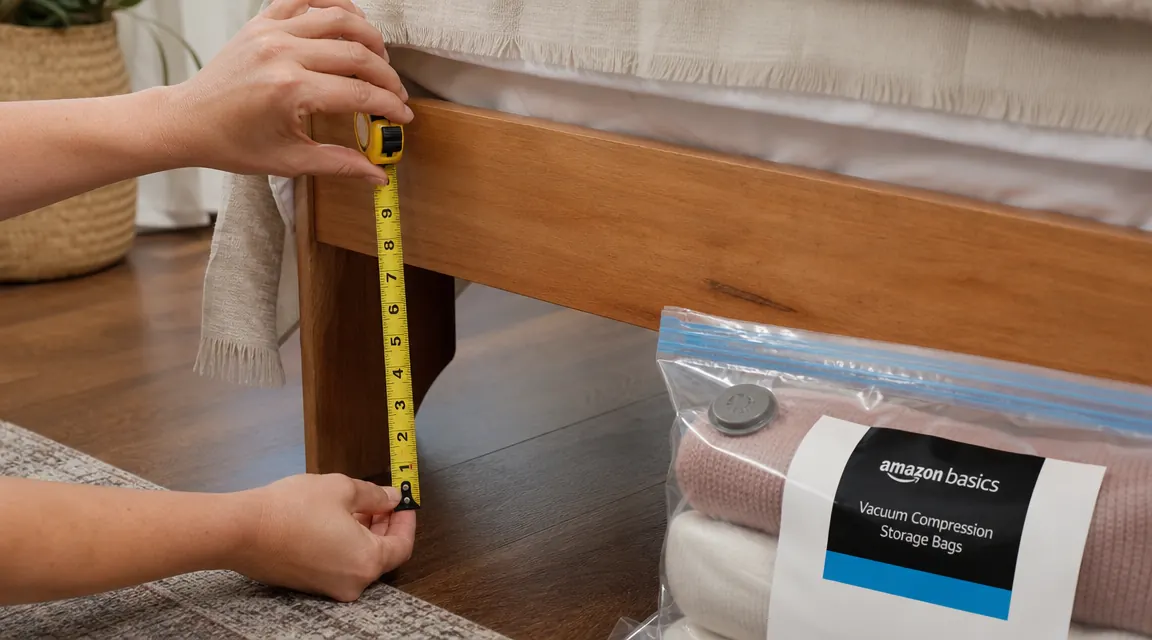
Amazon Check Today's Price on Amazon →Step 1: Measure Your Under-Bed Clearance Before You Buy Anything
This step sounds obvious until you skip it, order a set of jumbo bags, and find out your bed sits 7 inches off the ground. Get a tape measure and check three numbers: height from floor to the bottom of the frame at the center, at the sides, and at the foot. Bed frames are not uniform. A platform bed with a center support rail can drop to 5 inches in the middle even when the sides give you 9. Slats also vary. Measure where the bag will actually sit, not just at the edge.
The compressed thickness of a vacuum bag depends on what is inside it. A single fleece blanket compresses to around 1.5 inches. A down comforter or thick winter coat fills the bag and compresses to 2.5 to 3 inches. If your clearance is 7 inches, you can realistically stack two compressed bags, one on top of the other, and still slide them in without scraping the frame. If your clearance is 5 inches, one layer only. Write the number down before you move to step two.
One more measurement worth taking: depth from the edge of the bed to the center or far wall. Most standard queen and king beds sit 19 to 23 inches off-center to the edge. That determines whether you need a bag you can reach by hand or one that requires a long flat storage bag with a loop handle for pulling. The Amazon Basics multi-size packs include both short and long bag dimensions, which is part of why I use them instead of single-size packs.
Step 2: Choose the Right Bag Size for Each Category of Item
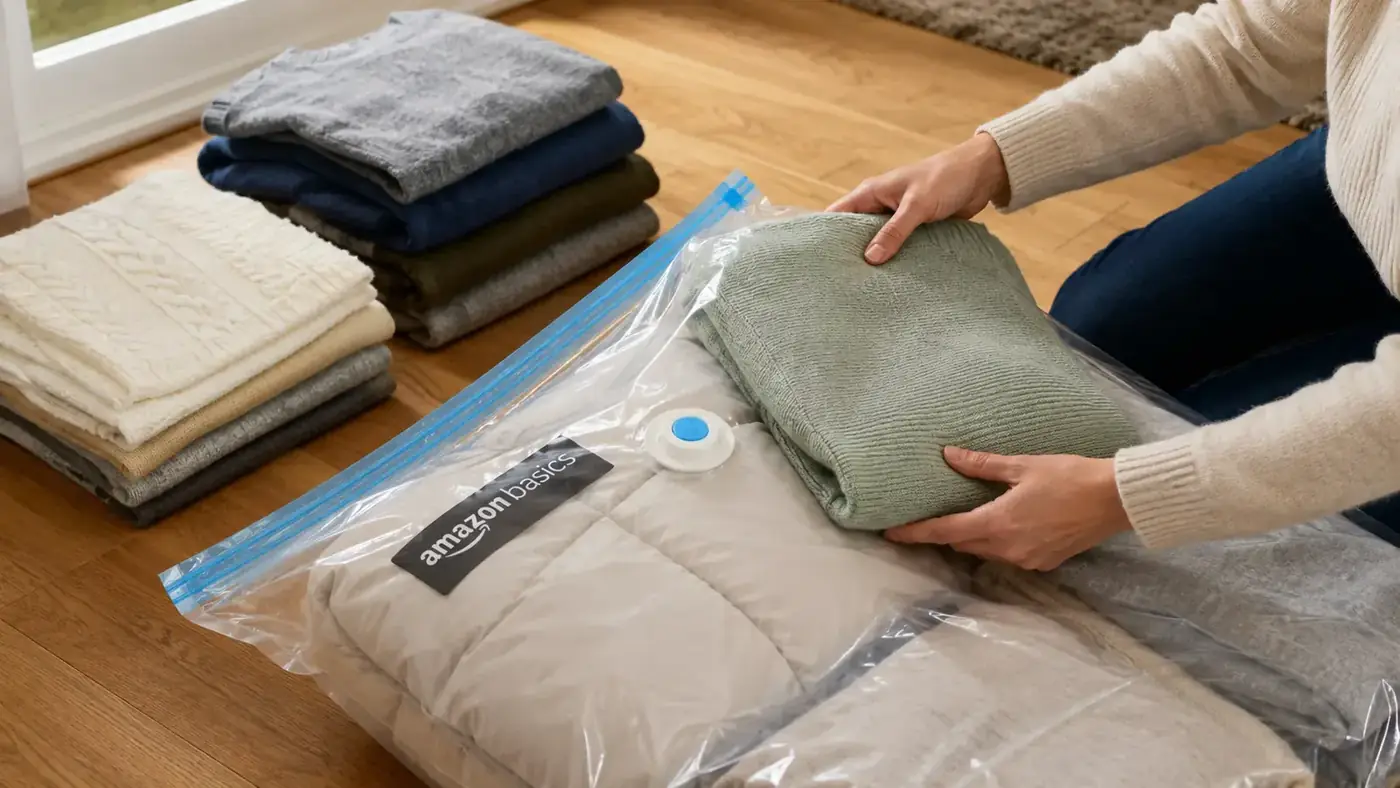
The most common mistake I see: people stuff everything into the largest bag available because it seems more efficient. It is not. A jumbo bag packed with a mix of sweaters, a comforter, and a spare set of pillowcases is almost impossible to compress evenly. The vacuum pulls air from the corners but the center stays thick because the fabric is too dense and mixed. You end up with a bag shaped like a pillow at the center and flat at the edges, and it will not slide under a low frame.
The better rule: one category per bag, sized to fit that category loosely before you seal it. Large bags work well for bulky single items: a down comforter, a duvet insert, two bed pillows, a thick winter coat. Medium bags handle folded sweaters (five to eight, depending on weight), fleece blankets, scarves and gloves in a group, or off-season jeans. Small bags are for the stuff you keep forgetting exists: wool socks, swimsuits, a baby outfit you are holding onto. Mixing sizes in one purchase means you have the right bag when you need it.
The Amazon Basics set comes in multiple pack configurations. I buy the multi-size variety pack because it includes jumbo, large, and medium bags in one order. Each bag has a double-zip seal across the top and a standard vacuum port in the center. The port fits any household vacuum nozzle without an adapter. I have used it with a canister vacuum and a stick vacuum and both work fine.
Step 3: Sort and Pack Only What Belongs in Long-Term Storage
Under-bed storage works on one rule: it is for things you do not need until next season, not for things you use monthly. If you vacuum-seal your favorite cardigan in October because you want the closet to look clean, you will tear open the bag in November when the temperature drops unexpectedly. The bag loses compression when you open it. The system breaks down. Be strict about what goes in.
Seasonal clothing is the obvious category: winter coats and heavy sweaters stored in spring, summer dresses and shorts stored in fall. Add in extra bedding like a spare comforter or duvet insert you only swap in on very cold nights. Seasonal gear like ski base layers or beach towels belongs here. Kids' clothing in the next size up is one of my best uses for a large bag: seal this winter's too-small snowsuit and it is waiting, clean and compressed, when the next kid grows into it.
Before you pack, wash everything. Every item going into long-term storage should be clean and fully dry. Moisture sealed into a bag causes mildew regardless of how well the vacuum seals. I learned this the hard way in my second apartment with a fleece pullover that spent five months slightly damp. Check that nothing is still warm from the dryer before you seal it, especially if you live somewhere humid.
Under-bed storage works on one rule: it is for things you do not need until next season, not for things you use monthly. Be strict about what goes in.
Step 4: Vacuum Down and Slide Under the Bed Correctly
Lay the bag flat on the floor before you start sealing. Distribute the contents evenly across the interior so no section is piled thick while another is empty. Overfilling is the most common sealing problem: the bag stretches across the top and the double-zip does not close flat. Fill the bag to about 80 percent of its capacity, leaving enough room for the zip to seal cleanly without the fabric bulging at the closure line.
Run your fingers along the zip seal to close it fully. You will feel two distinct clicks when both zip tracks are engaged. Then open the vacuum port cap and press your vacuum nozzle directly onto the port, holding it flat so no air leaks around the edges. Run the vacuum for 20 to 30 seconds on a standard bag. You will see the bag flatten visibly in the first 10 seconds, then slow. Stop when the bag feels firm and has no pillowy soft spots. Close the port cap immediately while the nozzle is still pressed down. This prevents any air from rushing back in during the transition.
Once compressed, the bag should lie flat enough to slide under the bed without lifting the frame or catching on slats. If yours feels thick at one corner, that area probably has more fabric bulk. You can smooth it down by pressing firmly on the thick spot while the bag is still warm from the vacuum. Slide the bags in with the valve facing outward so you can check the seal in a few days without pulling the bag out completely. A bag that has lost air will feel soft within 48 hours. If that happens, check the zip line for any gap and re-vacuum.
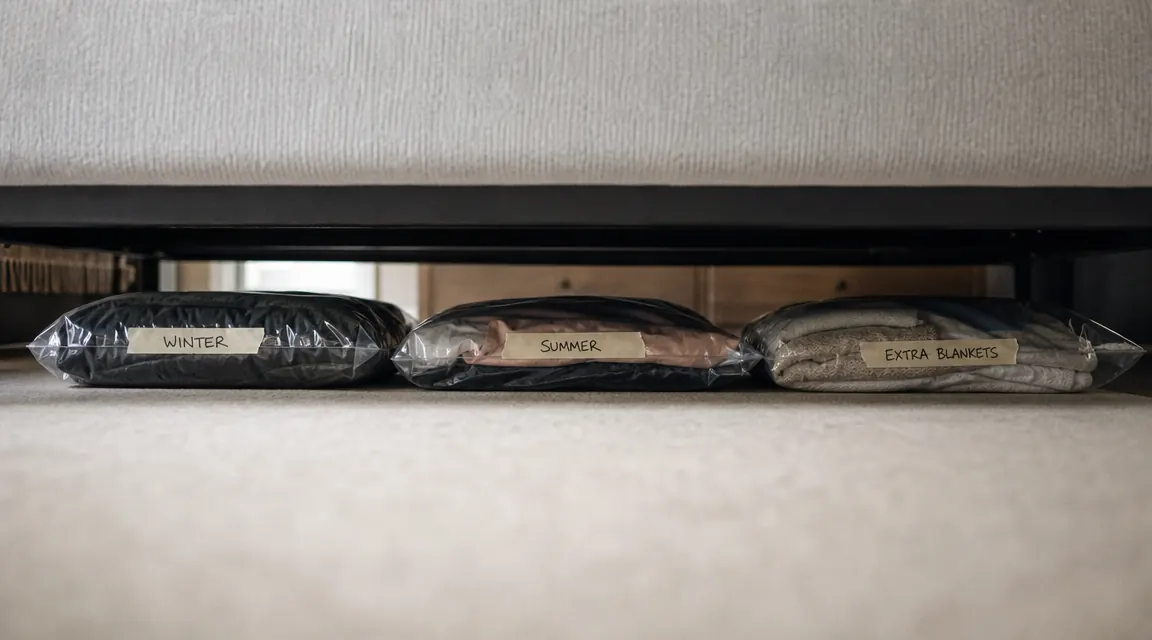
Step 5: Label and Rotate Seasonally So Nothing Gets Buried
The second most common under-bed storage failure, after overfilling bags, is not being able to find anything when you need it. You vacuum down four bags, slide them under, and by February you cannot remember which bag has the extra down comforter versus which one has the ski socks. Labeling takes two minutes and saves you from pulling every bag out to identify them.
I use masking tape and a Sharpie: season, year, and contents in three words or fewer. For example: WINTER 26 / COATS, or SPARE BEDDING / COMFORTER. Stick the label on the end of the bag that faces outward from the bed. You can read it without moving the bag. I skip fancy label systems because they need to survive being written on a slightly plasticky surface in a dusty space. Masking tape sticks reliably and peels cleanly when you open the bag in six months.
Rotation matters too. When you pull winter items out in the fall, the spring and summer bags go back under in their place. Keep the current-season storage at the most accessible edge and the deepest items reserved for things you will not need until the following year. If you have kids growing into clothes, put those bags furthest back. Items you will definitely pull out at a set month stay at the front edge where you can reach them without getting on the floor. This discipline is what keeps the system functional after the first season.
What Else Helps
Vacuum bags do the heavy lifting but a couple of small additions make the system even tighter. A bed riser set is worth considering if your frame sits below 7 inches. Most risers add 3 to 6 inches of clearance and cost under $20. That difference lets you fit bags stacked two deep instead of one, which effectively doubles your under-bed capacity. Look for risers with a non-slip grip pad on the bottom so the frame does not creep over time. Also useful: a thin flat storage bin for items you do not need to vacuum-seal but want to keep dust-free, like shoe boxes or small folded blankets. Slide it alongside the vacuum bags at the edge for easy access. The bin handles what the bags cannot, and the two systems together cover almost everything a bedroom closet cannot hold. For a deeper look at what you can fit under a bed once vacuum bags are in the mix, see the full breakdown in the related guide on 10 things you can finally store under your bed. If you want more context on how the Amazon Basics bags hold up over a full storage season before you commit, the long-term vacuum storage bag review covers seal durability, size accuracy, and whether the bags re-compress cleanly after opening.
Ready to compress that pile in your closet down to 2.5 inches?
Amazon Basics Vacuum Storage Bags are available in multi-size packs with jumbo, large, and medium bags. Double-zip seal, no-adapter valve, and over 90,000 reviews back up the basics: they hold, they compress, and they fit under a standard bed frame.
Amazon Check Today's Price on Amazon →